Maybe you are in a hurry to get the kitchen renovation done and want to paint the cabinets as early as possible or maybe, the thought of all the mess sanding creates scares you.
Not to forget, sanding all the cabinets means working your hands to the bone.
Thankfully, I have some good news for you. You do not need to sand the kitchen cabinets for painting. With some Deglosser, you can revamp your kitchen cabinets in half the time (if not lesser).
And in this detailed guide, we’ll tell you all about it.
How to Paint Kitchen Cabinets Without Sanding

If you want your cabinets to be eye-catching and new-like again, you must paint them properly and that’s not going to happen if you leave all the drawers and doors on.
So here’s how to safely remove them without chipping or breaking them.
Removing the drawers
Most modern cabinets have removable drawers. All you have to do is lift it a bit and pull it out to dislodge it from the tracks inside. Once removed, stack them up in an empty area.
Be gentle, pulling, and pushing or jerks can break the tracks. In case the drawer isn’t removable or won’t come I’d suggest you leave it in and paint it all together.
Removing Hinges and Door Hardware
Unscrewing the doors with a screwdriver will take you hours if not 1-2 days and that’s where a small drill comes in handy. But if you do not have a drill and cannot borrow or rent it either, a screwdriver is your best bet. On the bright side, it is much cheaper.
Once the door is off, turn it around and remove all the handles. These are screwed to the doors and thus, should easily come off with a drill.
Note: You definitely do not want to be painting them as their difference in color creates a nice contrast. Plus, it would remove the shine from it.
If you have different handle styles and designs for the various doors make sure you separate and label them beforehand and store them all away from the mess.
Removing the Shelves
Now that the doors are out the next step would be to empty the cabinets (in case you haven’t already done it).
Once again, separating items from each cupboard and labeling them will make putting back things after painting a breeze. Once all the cabinets have been emptied, the last step is to remove the cupboard.
Now, in my cabinets, the shelves were not attached with screws or built-in. Instead, they were placed on brackets to hold them in their place which makes removing them easy peasy. In case you have built-in shelves, I’d suggest painting them with the cabinet itself.
Once the frame has been separated the next step would be to clean it so dirt and grime don’t come in the way and ruin the paint.
Here’s what you can and shouldn’t use
How to Clean the Kitchen Cabinets Before Painting

Use a Degreaser and Sponge
Which degreaser should I use for the cabinets? If that’s what you are wondering, I got you covered. I have been using the Stanley Home products Original Degreaser and it works like a charm.
All the grease and grime are gone in a matter of seconds irrespective of whether you get hard or soft water. To top it all, you need little of the solution to do it and won’t have to sit there scrubbing it all out for hours.
And since you won’t have to scrub so much, it also lowers the chances of you damaging the wood by mistake.
Another thing I loved about this product is that it is biodegradable and phosphate-free and does not leave a bad smell either.
To top it all, it costs less than $20.
Wipe It All Down
As you clean with the degreaser, make sure you have a wet sponge by your side as well to wipe the excess degreaser off the shelves, the sides, the doors, and even the nooks and crannies of the cabinets.
After this, let the cabinet dry off for about an hour or two. In case you are in a hurry, I’d suggest placing the cabinets and the components under the fan.
Use a Liquid Deglosser
When you are choosing a Deglosser for the job you again, want something biodegradable and water-based. This is why I trust only the KRUD KUTTER GO32.
It is also relatively safer than other Deglossers but you still want to take the cabinets and the doors outside or any are with good ventilation.
That is because fumes from these Deglossers are potent and can cause a variety of issues such as breathing difficulties, eye irritation, or skin rashes. To avoid these problems you can further use gloves, and wear full-sleeve clothes.
Take a good squirt of the Deglosser on a clean, coarse cloth and start rubbing it on the front and back of the doors, shelves as well as the drawers and the frame of the cabinets.
You will need less Deglosser for the frames since lesser varnish is used on them as compared to the doors. Plus, they are also cleaner.
Once you are done applying the Deglosser, you want to give it about 30-35 minutes to dry. That’s ample time and between this period do not touch it with your bare hands as it can still cause irritation and burning.
How to Paint the Kitchen Cabinets
Start with the primer
This step is a must in case you have old cabinets with stains or dark knots. Primer acts as an adhesive and thus allows the paint to stick better to the cabinet, in turn, eliminating those old stains and knots.
To apply it, use a paintbrush with medium-sized bristles. Make sure you don’t leave the Deglosser to dry for too long. 30-35 minutes is all the time it needs or the primer and, in turn, paint won’t stick to the cabinets putting all those hours of hard work to waste.
Give the primer about 2 hours to dry. Don’t forget to do the back and the front of all the doors, frames, and drawers. Once again, wear your gloves, shoes, and any other safety equipment you have (even a mask would be perfect).
Let’s Get Painting
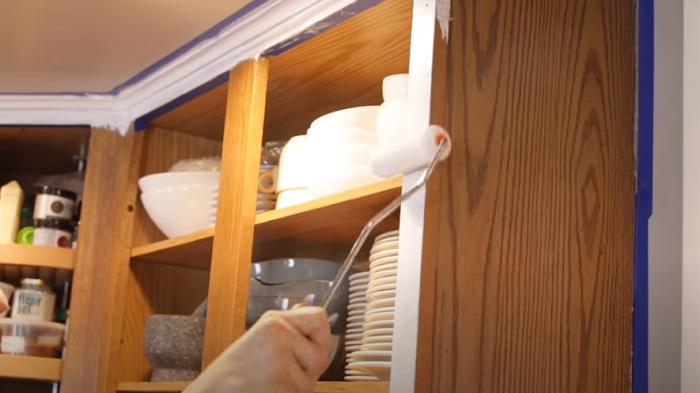
To paint the sides and front a roller is just what you need. I have been using the Bates Paint Roller for a year now and works just fine. This baby costs less than $15 and comes with 11 painting gear that includes rollers of different sizes, brushes, and even roller covers.
Start by painting the front and the back of the doors and drawers. Since these are flatter, painting them is easier and takes little time. Just make sure you move the roller in the direction of the grains.
The roller won’t run smoothly over the molds and crevices though and that’s where the different brushes in the set come to the party.
In case you find lumps of paint or air bubbles anywhere make sure you get rid of them asap with the help of a fine-bristle brush because if they happen to dry, getting them out can be a long-drawn process.
The painting process should be done in an open area as it will quicken the drying process. As you complete one set of the cabinets, drawers, and doors, move on to the next while the first one dries.
And voila, that’s your first coat completed. Now, give it all about 4-5 hours to dry before you start applying the second coat.
The process remains the same, roll, paint the hard to reach areas with the brush, remove the bubbles and lumps and let dry again. In case your cabinets are a tad darker, you can even go for a 3rd coat.
But make sure the layer of the coats are thin (even if that means going for a 4th round).
Let it Dry
Once you are satisfied with the paint let the cabinets dry for about a day before you start reattaching it all. Do it too early and you will find dents and scratches everywhere.
You also want to keep the use of drills to a minimum when screwing handles and shelves back as pushing it too far can also damage the paint by creating dents and holes.
If you have marked the handles and the door positions correctly, attaching everything and putting the stuff back into the cabinets should be the easy part. Make sure you clean the hinges and handles though with the same degreaser so your cabinets look nice and clean for months to come.
Few Tips to Keep in Mind
During the entire painting process, the one thing that is sure to be a huge mess is the floor. And I am guessing you have expensive marble or other attractive floorings like wooden flooring that you cannot risk. Thus, you must cover the entire floor.
To do this, I use rosin paper, a recyclable and durable felt paper that has been specially designed for covering floors during painting at construction sites. You can even use this on the nearby walls in case you are worried about splatter. Use tape at the ends to keep the paper in place.
Another thing I love about the Rosin paper is that it is cheap (costs less than $30) and can be easily rolled and put away when not in use. You even cut out the excess and wrap your handles and other accessories in it.
In case there are portions of the cabinet that you do not want to paint (like the molds), use tape to cover them up at the start of the process. Once the paint dries, the tape will easily come off and those areas remain splatter-free.
Don’t forget to label everything. You also do not want to be losing any of the screws and hinges. For this, I usually group the screws and wrap them in tape.
When it comes to choosing a color for the cabinets, go for something that contrasts and stand out in the kitchen as it will make it more eye-catching. For example, my kitchen has a black countertop while the kitchen cabinets are bright red with grey molding.
You can also go with white and other lighter colors in case you too have a darker countertop.
In case you have any bumps on the cabinet doors or frames, use a scraper to get rid of them.
Another thing you want to ensure when applying paint is that the surroundings are well lit so you can spot any left out areas quickly.
Also, painting is a long process. Yes, you can skip the sanding but not any other steps like drying or de-glossing or even the primer.
Lastly, give everything ample time to dry.
Conclusion
There’s everything you need to know about painting kitchen cabinets without sanding. This entire process should take about 2-3 days depending on how quickly the paint dries and how fast you are with the detaching and reattaching.
If you have any questions about the process or are facing issues like the paint coming off, etc. shoot them at me via the contact page. Feel free to add images if needed. You can even drop comments below.
And if you have gotten it right, we’d love to feature your work on the site.
Till then, happy DIYing.
